
Search help pages:
Apresa Support: Diagnosing and Solving Apresa Problems
Contents of this page
1. General procedure
2. Log Files
3. Solving Problems for Passive Recording
3.10 VoIP Tracing
4. Command line / PuTTY
1. General procedure
When trying to find out what is exactly the problem, you can ask some questions.
• Did it work before? If so, what has changed?
• Is the problem in Apresa, or is the problem in the environment of Apresa?
• Is Apresa updated to the latest version? (see changes in online Apresa change log)
• If the problem is not (easily) solvable, some information can be useful:
– log files
– if applicable, traces of the problem
– date & time of the problem / call, and other details, such as phone numbers that should have been detected etc. are helpful and often essential for analysis.
2. Log files
• Tools, System, Download Log Files, or Download Extended Log files. The extended log files can be a lot bigger, but are needed when:
– it is a busy system, or the failure happened a long time ago (if reproducable, better take out a new log shortly after the problem happens)
– when the problem might be in the hardware or in the Linux drivers.
• The log file package has .tgz extension and can be opened / checked with 7zip
• The log files contain the configuration in the file config.dump. This does not contain the user list and their properties.
VoIP log files
• The log files contains the latest VoIP trace (.pcap) inside it (only one trace, but one file per network interface), but if you download again, the VoIP trace will be gone. See also VoIP tracing.
Card recording log files
• The regular log files are usually enough if there is a (small) Caller ID problem.
• For more detailed logging (for Synway), in Options, System settings, advanced, enable “Digital TDM Detailed Logging”. This logging can be switched on while the system continues to record. Collect log files in Tools > System > Archive log files. ShCtiDSTxxx and ShCtiAPIxxx of the relevant time period.
• For more advanced tracing (raw wave etc.) see separate document (Apresa – TDM procedure.pdf)
3. Solving Problems for Passive Recording
See also chapter “Solving Problems for Passive Recording” of the Call Recorder Apresa manual.
3.1 Turn on “Collect information about all calls”
In the Apresa web interface, go to: Options → System settings → VoIP settings → Collect information about all calls. Select “Active Calls” and Click “Apply”.
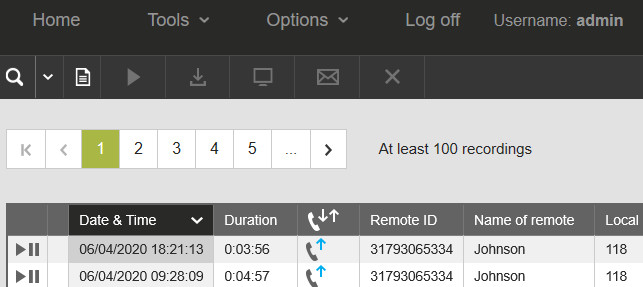
The page “Active Calls (All)” is now enabled. This page is meant for solving recording problems. Disable it after diagnosis, because it consumes resources.
Go to: Tools → Active Calls (All)
The Active Calls (All) page shows live information about calls even before they are connected (while ringing), and also about calls that are not recorded.
3.2 VoIP problem: the Apresa is not recording
– Is it passive or active recording? Active recording (CSTA etc.) is not discussed in this chapter.
– Check if anything is seen in:
– Active Calls (All) (from the Tools menu, when enabled)
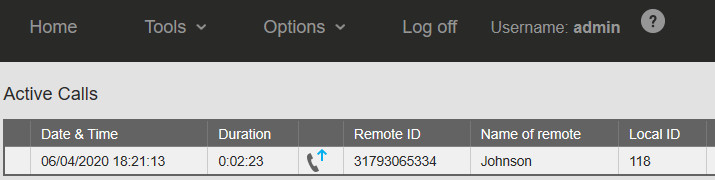
– Active Calls (from the Tools menu)
– the Home screen (main call listing)

Picture: Tools → Active Calls (All)
Picture: Tools → Active Calls
Picture: Home, main call listing
3.3 No calls are seen in Active Calls (All)
Tools → Active Calls (All)
– Log in as admin with full permission.
– Enable “Options → System settings → VoIP settings → Collect information about all calls” to be able to reach the Active Calls (All) page.
– Check if the port-mirroring (also known as SPAN) is configured correctly in the network.
– Examine: Options menu → System settings page → VoIP tab → VoIP network. For testing, try the option “All”.
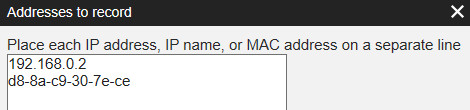
– Examine: Options menu → Recording settings → Addresses to record. For testing, try the option “Record everything”. If this helps, have look at the values you entered here. Did you enter IP or MAC addresses? Are they entered correctly?
3.4 Calls are seen in Active Calls (All), but not in Home screen.
Tools → Active Calls (All)
Note: A recording appears in the Home screen after the recording is completed, but for this to work you need to enable “Automatically refresh list of calls“ from the Options menu, Display settings. (Or you have to manually refresh the Home page.)
The Active Calls (All) page shows you the Recording state of the current call(s).

The following Recording states are possible:
– Recording state: Waiting for audio stream / connection.
There might be a problem with the audio stream or with the connection.
Audio stream problems (Waiting for audio stream / connection)
It is possible that Apresa receives SIP (call signaling data), without receiving RTP (audio stream). For example, this happens in the following case:
Example of an audio stream problem:
When SIP and RTP follow different routes in the network
Assume Apresa receives data using port-mirroring from/to the PBX, and SIP communication between telephones is sent via the PBX, but RTP communication is sent directly from phone to phone, not via the PBX.
In this case Apresa receives SIP, but doesn’t receive RTP (audio). Then the call is not recorded.
You can make a network trace in Apresa and open it in Wireshark to see if there’s RTP present or not. Apresa cannot record a VoIP call without receiving RTP. See VoIP tracing.
Connection problems (Waiting for audio stream / connection)
See: Options → System settings → VoIP → Start recording when connected.
![]()
If “Start recording when connected” is enabled, Apresa starts recording only after the call has been answered. For some protocols (non-SIP) Apresa might not be able to detect when a call has been answered. In this case, disable the option “Start recording when connected” to let it start recording.
– Recording state: Outside filter: Examine the recording filters (SIP filter and telephone number filters). See Options menu → Recording settings.
In this example, the Protocol is SIP. In that case you have to examine at the SIP filter. See the picture below.

– Recording state: Recording on demand: Examine the setting: Options menu, Recording settings, Recording on demand. The “Recording state” is “Recording on demand”. Nothing is recorded (yet). The “Recording state” changes to “Recording” when a recording starts. Turn it off for testing.

– Recording state: License overflow: Check VoIP licenses in Options menu, System settings, System tab. See Apresa Channel License Activation in the Apresa manual.
– Recording state: Deleted: This is used for the “Delete on demand” function. Go to Options, Recording settings to turn it off for testing.

– Recording state: Waiting for audio level: Examine Options → Recording settings → Audio Detection. When enabled, Apresa starts a recording when the “Audio level threshold” reaches a certain level (in dB). Turn this off for testing.

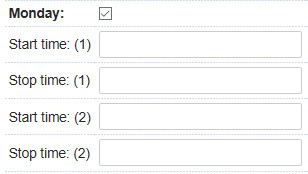
– Recording state: Outside schedule: Examine Options → System settings → Schedule.

For testing, check the box of the current day and remove the start and stop times from the edit boxes.
– Recording state: Direction filter:
Examine if the call direction filter is applied and correct this when needed.
– Recording state: Recording:
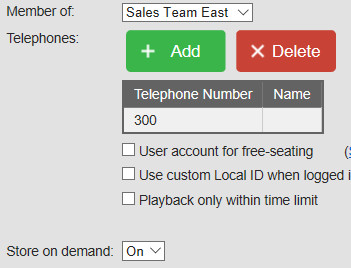
– Store on Demand. Examine the setting: Options menu, Recording settings, Store on demand. The “Recording state” is “Recording”, because Store-on-demand commands by the user are processed after the recording has finished.
– Store on Demand for a user. Check if store on demand is enabled for a user in the User account screens. See: Options menu, Users. Select the User and click Edit.
– Minimal recording duration. Examine the setting: Options menu, Recording settings, Minimal recording duration. The “Recording state” is “Recording”, because Minimal-duration checks are performed after the recording has finished.
– Check if you enabled the recording of incoming, outgoing, or local calls. Enable all three for testing. They are found in the Options menu, Recording settings.
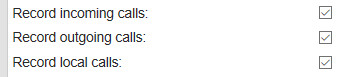
The “Recording state” is “Recording”, because these three settings are checked after the recording has finished.
Important: the detection of the call direction might be wrong or absent, in which case filtering on the call direction can lead to calls not being recorded, while they should be recorded.
See the separate description below on how to perform a network trace and collect log files.
3.5 Calls are seen in the Home screen but not playable (.mcf)
– The audio might use G.723 or another unsupported audio codec. Check if you can change the codec in the PBX. Support are codecs are G.711 (8 KHz, A-law and μ-law), G.722, G.729, GSM 6.10 and others.
3.6 VoIP problem: Detected phone numbers are incorrect
IP addresses are shown as both Local and Remote ID
This means Apresa sees audio streams (RTP), but not the call signaling.
– Check if a protocol setting is needed: Which protocol / PBX is it? For Siemens, Avaya, Ericson Mx-One, Nortel, Megaco H.248, Nortel UNIStim, Xpert, Samwin: enable the specific setting in System settings, VoIP tab.
– Check if call signaling is also port-mirrored (ask your network manager)
– Check if call signaling is not encrypted (ask your PBX manager)
IP addresses are shown as Local ID (Remote ID is OK)
– For some protocols, detection of a Local phone number is not supported
– For some protocols, it might be needed to reboot/restart/replug/relogin the phone
– Ensure all local phones are within the range specified in the Local IP addresses settings
3.7 VoIP problem: Direction is missing or incorrect, or Local/Remote ID swapped
– Enable Local and Remote IP address in Display settings
– Check Local ID and Remote ID of recorded calls, to see which one is actually the local / remote side, from that we know which IP addresses are local/remote
– Correct the Local IP addresses setting (System settings, VoIP tab). It only effects new calls.
– If an IP address is not consistently Local/Remote, don’t specify it.
– In some cases the option “SIP INVITE determines IP addresses” might be needed or give better result.
A quote from Options menu, System settings, VoIP settings.
Local IP Addresses: This setting is used to determine whether an IP address corresponds to a local phone (extension). It is also used for detecting of the direction of a call (incoming, outgoing, or internal). A singular IP address or an IP address range can be specified. To specify multiple IP addresses or ranges, separate them by a comma. An IP range must be specified in the CIDR notation. For example: 192.168.0.0/24 means that the first 24 bits are fixed, and the last 8 bits may vary, which means that, in this example, all IP addresses that start with 192.168.0. would be considered local.
Remote IP Addresses: In a VoIP call, there are two IP addresses that communicate. If one of them is in the Remote IP Address range, the other is consider local. The format is the same as for Local IP Addresses.
– When IP addresses cannot be used to determine direction (which is rare), use the setting “Local telephone numbers” (advanced VoIP setting) to use the phone numbers instead. To do this, go to the VoIP tab of the System settings and check the Advanced settings checkbox to see the advanced options.
3.8 VoIP problem: Dial codes (0-9 *#) are not recognized
– Dial codes are accepted only from the local extension side by default (System settings, VoIP tab, Dial code action).
– Check if the Local/Remote sides are correct and not swapped (see previous how to correct)
– In System settings, VoIP, set VoIP recording module to Default.
3.9 VoIP problem: Only the external partner is recorded
When only the external partner is recorded, this is possibly caused by incomplete port-mirroring of the RTP-stream (one side only). To make sure if incomplete port-mirroring is the cause of the problem, you can make a network trace, which will show it perfectly.
3.10 VoIP tracing
3.10.1 How to create a network trace
To help you solve a problem, the Vidicode team might ask you to send them a network trace. This is how to do it.
1. Log in as administrator (admin) in the web interface
2. Open the Tools menu, select System
3. Click the “Enable” button next to Network trace
4. Perform the specific action that was handled incorrectly by Apresa. (For example, if the problem was that incoming calls have no caller ID, then make an incoming call.)
5. Click the “Disable” button next to Network trace
6. Click “Download Log Files”
7. The filename is for example Apresa_logs_20180621_100000.tgz. Please verify if the downloaded file contains the .pcap trace file inside (Optional step)
8. If there are other situations that must be traced, then go back to step three. Each trace must be downloaded, before proceeding to the next trace.
9. Send the files to Vidicode including a description of what was recorded in the trace. If the files are less than 20 MB, you could use email to send them to support@vidicode.com.
3.10.2 How to inspect and verify a network trace
You can inspect the trace yourself.
– Use 7zip to open the tgz file. There is a separate pcap file per network interface.
– Extract the pcap and open it in Wireshark.
– For some protocols (at least SIP and H.323), it is possible to see the calls in Wireshark. In the Telephony menu, choose VoIP calls. This shows the list of calls, but even then, Wireshark does not always show phone number information. For example for Avaya H.323, Apresa can detect phone numbers, Wireshark cannot.
– Select a call, click the Flow button (or the Flow Sequence button)
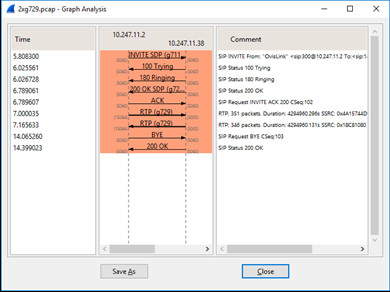
– There should be call signaling in both directions, and RTP (audio) in both directions. It shows the used codec (G.711 / G.729).
– To see if there is any traffic from an IP address: In the main screen of Wireshark, in the display filter, type: ip.addr==192.168.0.20 (for example)
– To see if traffic there is any SIP traffic, in the display filter, type: sip (it shows then only SIP packets), and for H.323 packets, type: h225
– HFA is on TCP port 4060. Encrypted HFA is on TCP port 4061.
– To check for encrypted SIP, type: tcp.port==5061 (encrypted SIP cannot be recorded)
– For Aastra, SIP calls are expected without phone number info
– For Alcatel, display filter: udp.port==32000 or udp.port==32512 (or in some cases, it might be plain SIP)
– For Avaya IP Office, H.323 calls are expected without phone number info
– For Nortel UNIStim, display filter: udp.port==5100
– For Panasonic, display filter: mgcp
– For Samwin, display filter: tcp.port==81
– For Xpert, display filter: tcp.port==9000
4. Command line / PuTTY
• The command line can be accessed remotely over SSH using Putty, or by directly connecting a monitor and keyboard to Apresa. Login username is vidi.
• When connected directly with a monitor and keyboard, the web interface can be started by typing the command: web (this is not possible through Putty)
• To see if an IP address is reachable from Apresa: ping 1.2.3.4
• To check disk space usage: df -h
• To reboot: sudo shutdown -r now (for Compact), but for most computers: sudo reboot also works.
• To shutdown: sudo poweroff (it will do the normal shutdown procedure)